Cutting the Cord Server Guide – Part Three: Newsgroups, NZBs, and SABnzbd
So we have our foundation laid and our storage setup, its now time to get to the heart of our server and set up newsgroups.
What are newsgroups and why do I want them?
Newsgroups which are also referred to as Usenet, actually date back to the beginning of the internet. At the beginning they were used as bulletin boards for discussion across the internet. Over time, support was added to to allow posts of binary files which allowed for the sharing of files. As you can imagine, newsgroups can get fairly cluttered with all of these various posts and files. The solution to this became nzb files. These files tell certain software packages where the files and posts are located so they can be easily found and retrieved. If you have any familiarity with torrents, at this point you probably feel that newsgroups are just an antiquated version of those, but you would be wrong. Torrents are a peer to peer connection, meaning any one you are connected with can see information about your computer. Newsgroups on the other hand are a direct connection and are therefore more secure. The only people you are connecting to are the Usenet provider.
I can see the advantage of Newsgroups, how do I gain access?
There are several Usenet providers out there and if you do a google search, I’m sure you’ll find many. Personally, I prefer newshosting.com. Newshosting was recommended to me by a coworker and when I did my own research I found them to be one of the best and cheapest. Unfortunately, Usenet providers (at least good ones) are not free. If you remember back to my introduction post I stated that I pay $19.95 a month for one of my services. This is that service. Through newshosting.com I have unlimited data transfer, up to 30 connections, and a VPN. Newshosting also has a retention (how long they keep posts or files) of 3559 days which is one of the longest I found. I am paying $19.95 a month for this service, but right now as of this writing and through the link found on this site you can get the service for $15 a month or $100 a year. Yes you can technically drop the monthly service to $10 a month if you opt out of the VPN but I would highly recommend getting the VPN service for reasons that will be made clearer in a future post. I have not used any other Usenet provider but they are out there if for some reason you don’t want to use Newshosting.
Regardless of who you decide to use for your Usenet provider, you will need to sign up with them. Once signed up, you will most likely be offered to download a customized software from them. You do NOT need to do this and in fact I never have. We will be using a different set of software that we will set up shortly.
So now I have access to a Usenet provider, how do I find what I’m looking for?
Earlier I mentioned using nzb files to tell software packages where to look. There are numerous sites out there devoted to indexing these files. In my experience, no one site has everything we are looking for, so we will be signing up for several of them. In this case, the more we sign up for, the better. There are many free nzb indexing sites out there, but as the adage goes, you get what you pay for. I recommend signing up for one pay nzb index site and several free ones. The ones I use are abNZB, NZBfinder.ws, NZBgeek, nzbplanet.net, SimplyNZBs, and Usenet Crawler. NZBgeek is the premium nzb indexer I use. They have several different levels of membership. I personally chose the lifetime membership as it was cheap ($30 as of this writing) and I never need to worry about paying for it again.
You need to register with each of the above listed sites. When you do, navigate to your profile page and find an API number or RSS key. This key will be a long string of letters and numbers. Copy this key to a notepad file that you can reference later. Make sure you note which site each key belongs.
I have literally registered for everything, what do I do with it all?
It is now time to install and setup SABnzbd. SABnzbd is the software that will be doing the actual downloading from our newsgroup. To get started, download the most recent version from their website and run the installer. When you are running through the installer, make sure that you check Run at startup, the rest of the options can be left at the default selections. When it is finished installing, run the application and it should open in a web browser. At the first window select the language you prefer and click Start Wizard. In the next window, first click Advanced Settings. Now you need to input your information for your Usenet provider. For Newshosting, the host will be news.newshosting.com. Enter the username and password for your Usenet provider and check the SSL box. Make sure the port number matches the port number of your newsgroup and set the connections number to the maximum number of allowed connections of your newsgroup (for Newshosting this is 30). Finally, click the Test Server button. If all goes well you should see a green message that says “Connection Successful” Once you see the connection successful message, click Next. You will now see a message stating setup is complete. Click the green button at the bottom that says Go to SABnzbd.
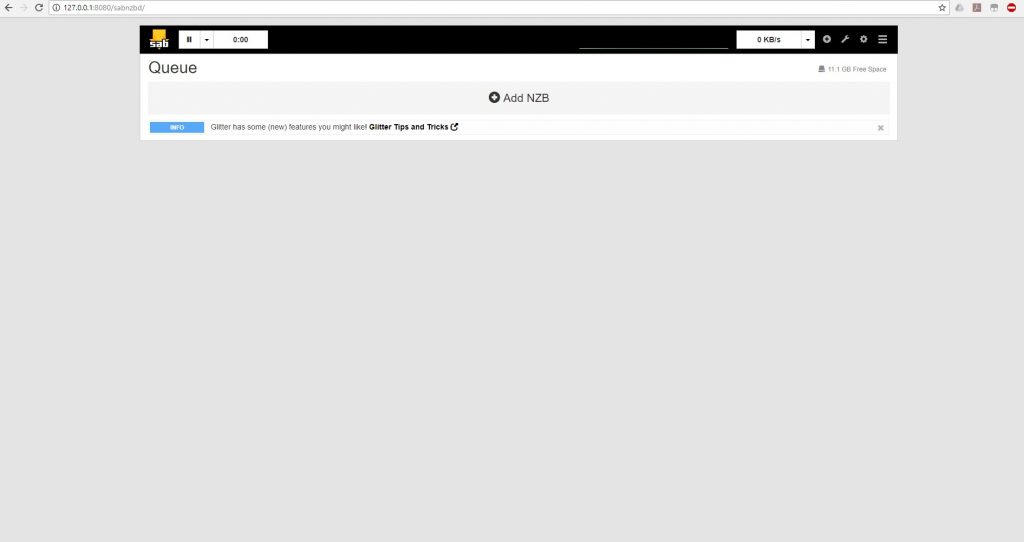
It is now time to actually set up SABnzbd. You should be seeing a screen that looks as follows:
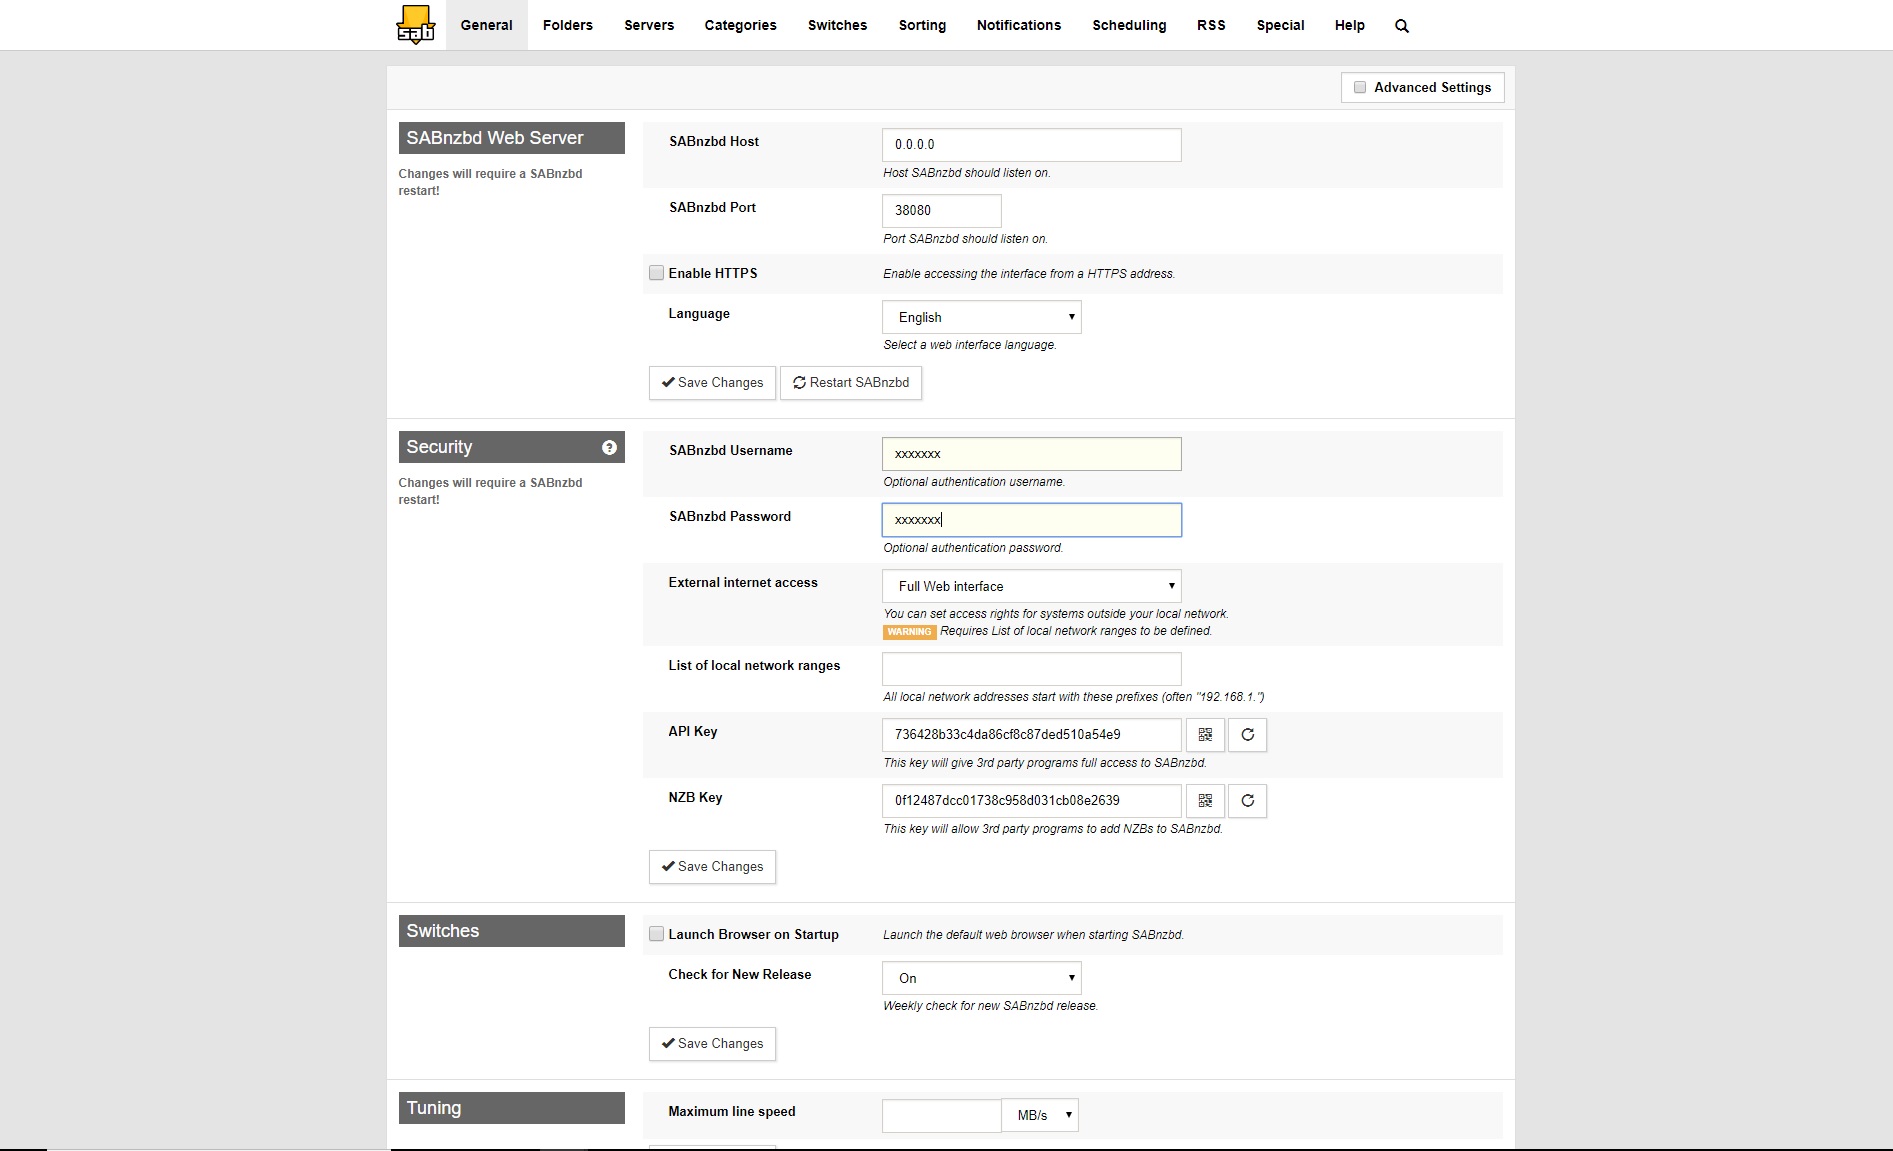
Click the gear icon in the upper right hand corner and then click General. You will then need to make the following changes:
- SABnzbd Host: 0.0.0.0
- SABnzbd Port: 38080
- SABnzbd Username: <Username of your choice>
- SABnzbd Password: <Password of your choice>
- External Internet Access: Full Web Interface
- Launch Browser on Startup: Unchecked
When done it should look like this:
If it does, click one of the Save Changes buttons. SABnzbd will now restart. Because we changed the port, we will have to manually go back into it. Type http://localhost:38080 into your browser and you should now see a login page. Login with the username and password you setup on the general settings and you should be back at the front screen. Click on the gear once again and then this time click on the Folders Tab. In this tab click on Advanced Settings. You now need to tell SABnzbd where to store temporary files. My recommendation is a download folder off your root storage directory. In my case as I setup a storage space drive as discussed in my last post my root directory would be D: If you setup a media folder, your root would be the folder path. Regardless, make the following changes to this tab:
- Temporary Download Folder: <root>\Downloads\incomplete
- Minimum Free Space for Temporary Download Folder: 1G
- Completed Download Folder: <root>\Downloads\complete
Click Save Changes and then go to the Switches tab. This tab does some quality control on the files you receive. Again we need to make some changes.
- Action when encrypted RAR is downloaded: Abort
- Unwanted extensions: exe, com
- Action when unwanted extension detected: Abort
- Direct Unpack: Checked
- Ignore Samples: Checked
- (Optional) If your ISP has data caps fill out the relevant information in the quota section
Once the changes are made click Save Changes and go to the Categories tab. We need to add two lines to this for our download managers we will be installing later. So add the following lines into the table
| Category | Priority | Processing | Folder/Path |
|---|---|---|---|
| sonarr | Default | Default | [root]:\Downloads\Incomplete\sonarr |
| radarr | Default | Default | [root]:\Downloads\Incomplete\radarr |
Once that is complete, we are finished setting up SABnzbd. In the next post I will be discussing how to setup a torrent downloader as a backup to the newsgroups.
Prev: Server Guide Part Two – Let’s Talk About StorageNext: Server Guide Part Four – Deluge of Torrents